Sunday, September 1, 2013

Celebrating The Coming Season With Fall Recipes For Hot Apple Cider And Candy Apples #HarvestFun #shop


My favorite season is fall, and here in Washington State, the leaves are already beginning to turn gold.
 I'm very excited about the fall baking that I will be doing, and making favorite fall recipes and discovering new ones, too.

I love making fall treats for family and friends. I'm a grandmother to four little ones, and they love it when I make or bake something delicious just for them.

This weekend I could feel fall in the air, so I decided to make candy apples with Candy Corn flavored M&M's, and some delicious Mott's hot apple cider.


I went shopping at Walmart to buy the new fall packaged M&M's. They come in four flavors, including Peanut, Peanut Butter, Milk Chocolate, and the flavor I bought, Candy Corn.

I have made candy apples with M&M's before, and they are always a hit. They are great for fall activities where a treat is needed, and the perfect cute spin on giving an apple to your child's teacher.


Candy apples are easy to make, and it's fun to find different ingredients to make the outside coating taste delicious.

Candy corn is something we always have on hand in the fall, so I knew the Candy Corn flavored M&M's would be great to roll the caramel apples in. I just used my mini Magic Bullet to chop the M&M's, dipped the apples in the melted caramel, and then rolled them in the candy.

I really love giving candy apples as an unexpected little gift, or a thank you. I almost feel guilty for how little effort it took to make them, when the receiver is so happy to get them.

These were a huge hit this weekend with my kids and grandkids, so I'll try the other flavors of the fall M&M's too, especially the peanut kind.


I also made some hot apple cider this weekend, and we sat outside on the deck with it in the evening. This could be the last time we will be doing that, as the evenings are getting quite chilly.

I like making my apple cider with a bit of a citrus twist, by adding orange juice and lemon juice to the Mott's apple juice. This recipe can be doubled or tripled for a larger group, and not only do the adults love it, but the kids do to.

And your kitchen will smell deliciously like cinnamon and spices.


I've been buying the Mott's brand of apple juice for years, and gave it to my children, and now to my grandchildren.

It's the base of this great tasting apple cider with a twist. I like heating a cup of this cider in the microwave for myself in the afternoon or evening.

For me, nothing says fall like apple cider. It's so easy to make your own, and it tastes so much better than the bottled kind.


I love how cute these apples came out, and my daughter thought they would make sweet gifts for the teachers on Back To School Night.


Recipe for Candy Corn Flavored M&M Candy Apples

Ingredients:

5 apples, washed and dried
5 popsicle sticks
1 11 ounce package Kraft Caramel Bits
2 bags Candy Corn flavored M&M's

Directions:

Insert popsicle sticks about half way into apples.

In batches, chop up M&M's in a Magic Bullet or blender. Heat caramel bits according to package directions.

Dip apples in caramel and twist by stick to  remove excess. Roll in crushed M&M's, then place on waxed paper. Place in fridge to set and cool.


Recipe for Mott's Hot Apple Cider With a Citrus Twist

Ingredients:

1 quart Mott's Apple Juice
1/2 cup water
1/2 cup orange juice
1/4 cup sugar
1/4 cup lemon juice
1 cinnamon stick
1 tablespoon brown sugar
2 table spoons cloves or cider spice mix
Additional cinnamon sticks for serving with cider

Directions:

In a large saucepan, combine the first 8 ingredients. Bring to a boil. Reduce heat: simmer uncovered for 15 minutes.
Strain, discarding cinnamon stick and cloves. Serve warm, garnish with additional cinnamon sticks.

Makes 5 cups.

For more great ideas visit the Fall Baking and Entertaining Pinterest Board.

Thursday, August 29, 2013

Recipe For Chocolate Dipped Macaroons


Do you like macaroons?

I love them, especially if they are dipped in chocolate. I came across this super easy recipe for making some.

These are perfect for an everyday cookie to keep in the cookie jar, or fancy enough to put in a pretty package and give as a gift. I'll be giving some at Christmastime for sure.


The recipe calls for very few ingredients, so use the best available. I buy the sweetened coconut from the bulk foods section of my grocery store. It's much fresher than the coconut in packages.

You can also use white, or milk chocolate to dip the macaroons in. I used dark chocolate this time.


Recipe for Chocolate Dipped Macaroons

Ingredients:

1/3 cup all-purpose flour
2 1/2 cups sweetened coconut flakes
1/8 teaspoon salt
2/3 cup sweetened condensed milk
1 teaspoon vanilla extract
4 ounces dark, white, or milk chocolate, melted

Directions:

Preheat oven to 350 degrees. Grease a large cookie sheet.

In a large bowl, stir together flour, coconut, and salt. Add condensed milk and vanilla; stir until well combined.

Drop batter by tablespoonful, 1 inch apart, onto prepared cookie sheet. Bake 15 minutes or until just golden on bottoms.
Transfer to wire racks to cool completely. When cookies are cool, dip top halves into melted chocolate. Let stand until set.

Makes 1 dozen cookies.


Tuesday, August 27, 2013

Sewing A Sweet Children's Owl Shirt


When you haven't sewn in decades, every little project seems like a triumph. This little top that I sewed for my granddaughter, made me enormously happy.

I can see myself sewing more complex projects in the future, and getting back to a part of my life that I really loved. When my five children were growing up, I just couldn't find the time to sew. But now that I have free time, I'm very excited!!


This top was quite easy, and I finished it in a few hours. I love that Ashley can wear it now as a summer top, and still wear it into the fall and winter with a long sleeved shirt underneath it.


The pattern is a Butterick See&Sew, pattern #3889.
I made the short top, but you can also make the cute dress. Again, it can be worn in the colder months with the addition of a shirt underneath it.


I really think the owls are cute!


If you make this top, I do advise measuring the length of your child's torso because this actually is a little shorter than I thought it would be.
Next time I will lengthen it a little, something that is super easy to do.

I really am having fun getting back into sewing. My daughter Megan just bought her very first sewing machine, so I'm excited to see what projects she starts sewing too.


Monday, August 26, 2013

Weekend In Pictures


The weather in the Seattle area is still gorgeous, and this weekend we took advantage of it. My daughters and I had some lunch at Pegasus, went to some great estate sales on Bainbridge Island, and saw the new Woody Allen movie, Blue Jasmine.

I know the weather will be changing sooner or later, and Seattle does live up to it's rainy reputation.
But for now, we are being thankful for those blue skies.

How was your weekend?


Thursday, August 22, 2013

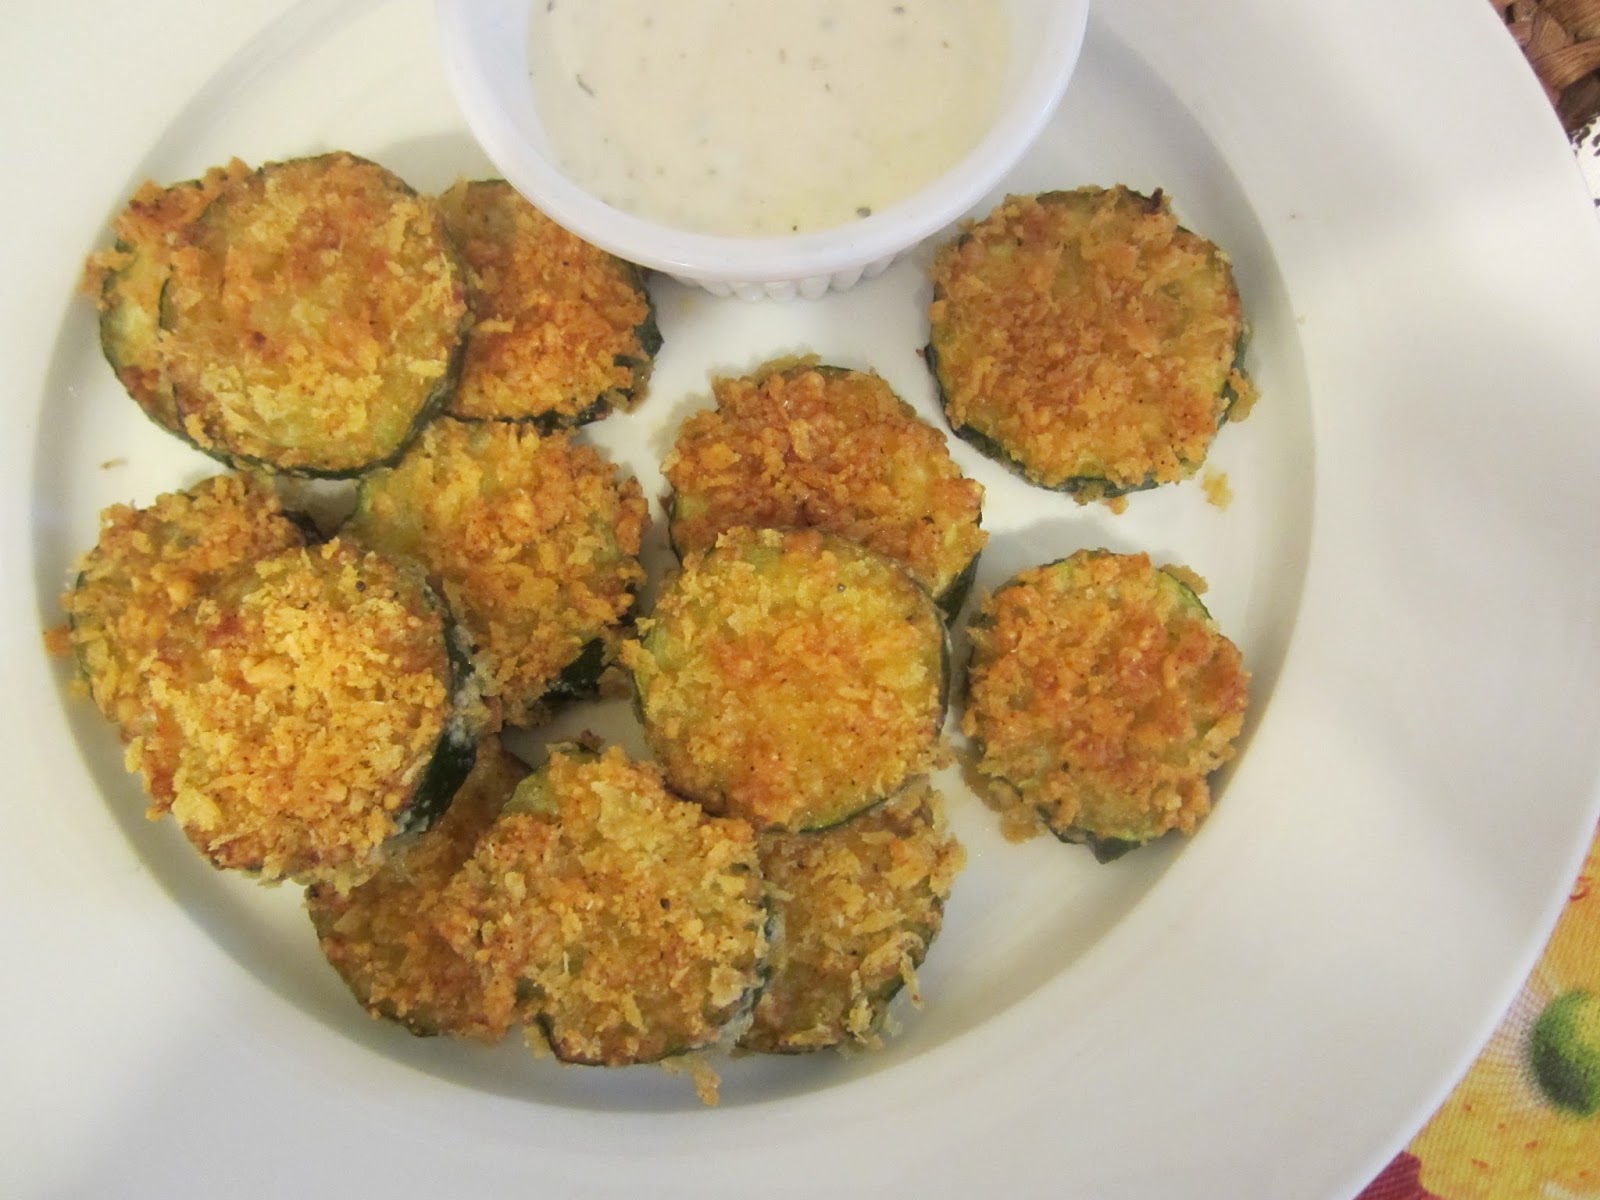
From The Garden, Making Zucchini Parmesan Crisps


I've really never been a huge fan of zucchini. I do love eating many kinds of veggies, but zucchini just never appealed to me. But that recently changed, and now I'm finding lots of different ways to cook with it.

These Zucchini Parmesan Crisps make a delicious snack or appetizer. We ate them with low calorie Ranch dressing with peppercorns, and there were requests for seconds. Next time I'll make a double batch.


The reason that I have begun to enjoy eating zucchini is because it is from our own garden. Having the garden this year, has opened my eyes to eating new foods, and ones I thought I wasn't very fond of. The zucchini will all be gone in a couple of weeks and I really will miss it.
Of course I can buy it at the grocery store, but it just isn't the same as growing it yourself.


The only thing I had to buy for the crisps was the freshly grated parmesan cheese. I like buying it in small batches from a little grocery store nearby. I used Panko breadcrumbs, but you can use regular, too. And I'm a bit addicted to Johnny's Seasoning Salt right now, but you can also use regular seasoning salt if you want.


Making the crisps is a great way to use up zucchini that you have grown, or friends have given you from their gardens.


I do recommend baking them on a wire baking rack if you have one. I think it makes them taste better.


Recipe for Zucchini Parmesan Crisps

Ingredients:

cooking spray
2 medium zucchini, about 1 pound total
2 tablespoons olive oil
1/4 cup freshly grated parmesan
1/4 cup bread crumbs, Panko or regular
1/2 teaspoon Johnny's seasoning salt, or regular seasoning salt
1/8 teaspoon black pepper

Directions:

Preheat oven to 400 degrees. Spray a baking sheet or wire rack with baking sheet underneath, with cooking spray.

Slice the zucchini into 1/4 inch thick rounds. In a medium bowl, toss the zucchini with the olive oil.
In a small bowl, combine the Parmesan, breadcrumbs, seasoning salt, and pepper.

Dip each round into the Parmesan mixture, coating evenly on both sides. Press mixture onto round if needed.
Place on prepared baking sheet/rack in a single layer. Bake zucchini rounds until browned and crisp, about 25 minutes.
 Remove with spatula, and serve immediately with your favorite dipping sauce.

Eat and enjoy!!


Monday, August 19, 2013

Celebrating A Birthday With A Homemade Coconut Birthday Cake


This weekend my family and I celebrated my daughter Samantha's birthday. It was a lovely day, with lunch at one of our favorite restaurants, and a delicious Italian dinner prepared for us by her husband.

I made her birthday cake, it was coconut, a kind I had never made before. It came out wonderful, and it's a perfect cake for any special occasion.
My grandsons picked out these fun candles, they thought their Mom would like them, and she did.


This recipe is from Ina Garten, otherwise known as the Barefoot Contessa. You can find it in the Barefoot Contessa At Home cookbook, and here is the recipe at the Food Network website.

This cake does take some time to make, and requires quite a lot of butter, but it is well worth the effort. I just love Ina Garten, and all of her recipes that I have tried always come out well. This is the first time I made this cake, and everyone loved it so much, I'll be making it again.


You don't even have to be a coconut lover to love the taste of this cake either. My six year old grandson was sure he wouldn't like the cake until he tasted it. He ate it all and told me he wanted this cake for his own birthday.


I think this cake makes a very pretty presentation, and whatever occasion you make for, you'll definitely enjoy it.

The recipe is quite long, so I have included it in the link above. I guarantee that if you make this cake, you'll love it!!