Showing posts with label Recipes. Show all posts

Friday, September 20, 2013

Recipe For Homemade Chocolate Donuts With Orange Glaze


Donuts are one of my favorite treats to eat. I've always thought that to make good donuts they had to be made with hot oil, but that isn't so anymore

Now you can bake them in the oven, and they are perfectly delicious. And they are easy and fast to whip up, too. These donuts are rich and chocolaty, with a sweet glaze made with a little bit of orange juice.

They are perfect with a hot cup of coffee in the morning, or a cup of apple cider in the evening


I recently bought this donut pan from Wilton, and it made making the donuts so easy. When you grease the pan, the donuts slip right out after baking, keeping their shape.


This recipe makes twelve donuts, and the pan lets you bake six at a time. And they only bake for ten minutes, so it doesn't take long at all to have warm, delicious, homemade donuts.


Recipe for Chocolate Donuts with Orange Glaze

Ingredients:

1 1/2 cups flour
1/2 cup cocoa powder
1 cup sugar
2 teaspoons baking powder
1/2 teaspoon nutmeg
1 teaspoon salt
1 cup buttermilk
2 eggs
2 teaspoons vanilla
3 tablespoons butter, melted

Glaze:

2 1/2 cups powdered sugar
2 tablespoons milk
4 tablespoons orange juice.


Directions:

Preheat oven to 325 degrees
Spray a donut pan with non-stick cooking spray

In a medium bowl, combine well all the dry ingredients. In a separate bowl, add the buttermilk, eggs, and vanilla. Beat them together and then add them to the dry ingredients.
Add the melted butter to the mixture, and mix until a batter has formed.

Spoon the batter into the prepared donut pan and bake for 10 minutes.
Then turn donuts out onto a cooling rack, and let donuts cool.

To make the glaze, put powered sugar in a medium bowl. Add 2 tablespoons of milk, and 4 tablespoons of orange juice. Stir until glaze is smooth. Add orange food coloring if desired.
Spread glaze on cooled donuts and let it dribble down the sides.

Makes 1 dozen donuts.


Thursday, September 12, 2013

A Recipe For Corn Pudding


When fall comes, my thoughts start turning to heartier foods for dinner. Things like roast beef, meatloaf, and roast chicken are some of my favorites.

This requires some great side dishes to go with the meat, and this recipe for corn pudding is delicious.
You can make it with corn cut right off the cobb, and while it's still available in the market, or frozen corn.
 Either way, this makes a wonderful side dish, and it's easy enough to make for everyday meals, or fancy enough to be on your Thanksgiving table.


The recipe comes from my favorite magazine, Country Living. I found it a few years ago, and every time I make it, there isn't a kernel left. Even the pickiest eaters love it.


Recipe for Corn Pudding

Ingredients:

Olive Oil for greasing baking dish
2 cups corn kernels, fresh or frozen
1 small red bell pepper, finely chopped
1/2 small yellow onion, finely chopped
2/3 cup shredded cheddar cheese
2 tablespoons flour
2 teaspoons Dijon mustard
1/2 teaspoon salt
1/2 teaspoon black pepper
2 large eggs
1 (12-ounce) can evaporated milk

Directions:

Preheat oven to 350. Lightly grease 2-quart baking dish with olive oil and set aside.

In a medium bowl, toss together corn, bell pepper, onion, cheese, flour, mustard, salt, and pepper.

In another bowl, whisk together eggs and milk. Stir egg mixture into corn mixture and pour into prepared baking dish. Bake until set, about 40 minutes.

Makes 6 servings.

Thursday, September 5, 2013

Grammy's Peach-Custard Pie


I'm not the Grammy in the name of this recipe, but I wouldn't mind being her. She has created quite a delicious recipe here, and one that takes advantage of the lovely peaches in the market right now.

But this is also quite fabulous if you used canned peaches like I did, and much faster. Either way, this is a pie that everyone will love.

My grandson Jayden had a piece and declared it was delicious, so maybe I should start calling it 'Nana's Peach-Custard Pie'.


Recipe for Grammy's Peach-Custard Pie

I used an easy Martha Stewart pie crust recipe. This recipe is for a top and bottom crust, but you only need a bottom crust for this peach pie. You can freeze the extra crust if you don't want to use it for another pie right away.

Filling Ingredients:

3 cups peeled and sliced fresh peaches (about 5 peaches) or
3 (15-oz.) cans sliced peaches in juice or light syrup, drained and rinsed
1 cup plus 3 tablespoons granulated sugar
1 tablespoon butter
3 tablespoons all-purpose flour
2 large eggs

Directions:

Prepare crust. Preheat oven to 375 degrees.

In a medium bowl, toss peaches with 3 tablespoons sugar; let stand 5 minutes.
In a blender, place butter, flour, eggs, and remaining 1 cup sugar. Blend until smooth.
Stir egg mixture into peach mixture;, then pour into pie crust.
Bake 45-50 minutes, or until filling has set, and top is golden.
Completely cool on wire rack. Chill about 4 hours before serving.

Serves 6-8, depending on serving size.


Sunday, September 1, 2013

Celebrating The Coming Season With Fall Recipes For Hot Apple Cider And Candy Apples #HarvestFun #shop


My favorite season is fall, and here in Washington State, the leaves are already beginning to turn gold.
 I'm very excited about the fall baking that I will be doing, and making favorite fall recipes and discovering new ones, too.

I love making fall treats for family and friends. I'm a grandmother to four little ones, and they love it when I make or bake something delicious just for them.

This weekend I could feel fall in the air, so I decided to make candy apples with Candy Corn flavored M&M's, and some delicious Mott's hot apple cider.


I went shopping at Walmart to buy the new fall packaged M&M's. They come in four flavors, including Peanut, Peanut Butter, Milk Chocolate, and the flavor I bought, Candy Corn.

I have made candy apples with M&M's before, and they are always a hit. They are great for fall activities where a treat is needed, and the perfect cute spin on giving an apple to your child's teacher.


Candy apples are easy to make, and it's fun to find different ingredients to make the outside coating taste delicious.

Candy corn is something we always have on hand in the fall, so I knew the Candy Corn flavored M&M's would be great to roll the caramel apples in. I just used my mini Magic Bullet to chop the M&M's, dipped the apples in the melted caramel, and then rolled them in the candy.

I really love giving candy apples as an unexpected little gift, or a thank you. I almost feel guilty for how little effort it took to make them, when the receiver is so happy to get them.

These were a huge hit this weekend with my kids and grandkids, so I'll try the other flavors of the fall M&M's too, especially the peanut kind.


I also made some hot apple cider this weekend, and we sat outside on the deck with it in the evening. This could be the last time we will be doing that, as the evenings are getting quite chilly.

I like making my apple cider with a bit of a citrus twist, by adding orange juice and lemon juice to the Mott's apple juice. This recipe can be doubled or tripled for a larger group, and not only do the adults love it, but the kids do to.

And your kitchen will smell deliciously like cinnamon and spices.


I've been buying the Mott's brand of apple juice for years, and gave it to my children, and now to my grandchildren.

It's the base of this great tasting apple cider with a twist. I like heating a cup of this cider in the microwave for myself in the afternoon or evening.

For me, nothing says fall like apple cider. It's so easy to make your own, and it tastes so much better than the bottled kind.


I love how cute these apples came out, and my daughter thought they would make sweet gifts for the teachers on Back To School Night.


Recipe for Candy Corn Flavored M&M Candy Apples

Ingredients:

5 apples, washed and dried
5 popsicle sticks
1 11 ounce package Kraft Caramel Bits
2 bags Candy Corn flavored M&M's

Directions:

Insert popsicle sticks about half way into apples.

In batches, chop up M&M's in a Magic Bullet or blender. Heat caramel bits according to package directions.

Dip apples in caramel and twist by stick to  remove excess. Roll in crushed M&M's, then place on waxed paper. Place in fridge to set and cool.


Recipe for Mott's Hot Apple Cider With a Citrus Twist

Ingredients:

1 quart Mott's Apple Juice
1/2 cup water
1/2 cup orange juice
1/4 cup sugar
1/4 cup lemon juice
1 cinnamon stick
1 tablespoon brown sugar
2 table spoons cloves or cider spice mix
Additional cinnamon sticks for serving with cider

Directions:

In a large saucepan, combine the first 8 ingredients. Bring to a boil. Reduce heat: simmer uncovered for 15 minutes.
Strain, discarding cinnamon stick and cloves. Serve warm, garnish with additional cinnamon sticks.

Makes 5 cups.

For more great ideas visit the Fall Baking and Entertaining Pinterest Board.

Thursday, August 29, 2013

Recipe For Chocolate Dipped Macaroons


Do you like macaroons?

I love them, especially if they are dipped in chocolate. I came across this super easy recipe for making some.

These are perfect for an everyday cookie to keep in the cookie jar, or fancy enough to put in a pretty package and give as a gift. I'll be giving some at Christmastime for sure.


The recipe calls for very few ingredients, so use the best available. I buy the sweetened coconut from the bulk foods section of my grocery store. It's much fresher than the coconut in packages.

You can also use white, or milk chocolate to dip the macaroons in. I used dark chocolate this time.


Recipe for Chocolate Dipped Macaroons

Ingredients:

1/3 cup all-purpose flour
2 1/2 cups sweetened coconut flakes
1/8 teaspoon salt
2/3 cup sweetened condensed milk
1 teaspoon vanilla extract
4 ounces dark, white, or milk chocolate, melted

Directions:

Preheat oven to 350 degrees. Grease a large cookie sheet.

In a large bowl, stir together flour, coconut, and salt. Add condensed milk and vanilla; stir until well combined.

Drop batter by tablespoonful, 1 inch apart, onto prepared cookie sheet. Bake 15 minutes or until just golden on bottoms.
Transfer to wire racks to cool completely. When cookies are cool, dip top halves into melted chocolate. Let stand until set.

Makes 1 dozen cookies.


Thursday, August 22, 2013

From The Garden, Making Zucchini Parmesan Crisps


I've really never been a huge fan of zucchini. I do love eating many kinds of veggies, but zucchini just never appealed to me. But that recently changed, and now I'm finding lots of different ways to cook with it.

These Zucchini Parmesan Crisps make a delicious snack or appetizer. We ate them with low calorie Ranch dressing with peppercorns, and there were requests for seconds. Next time I'll make a double batch.


The reason that I have begun to enjoy eating zucchini is because it is from our own garden. Having the garden this year, has opened my eyes to eating new foods, and ones I thought I wasn't very fond of. The zucchini will all be gone in a couple of weeks and I really will miss it.
Of course I can buy it at the grocery store, but it just isn't the same as growing it yourself.


The only thing I had to buy for the crisps was the freshly grated parmesan cheese. I like buying it in small batches from a little grocery store nearby. I used Panko breadcrumbs, but you can use regular, too. And I'm a bit addicted to Johnny's Seasoning Salt right now, but you can also use regular seasoning salt if you want.


Making the crisps is a great way to use up zucchini that you have grown, or friends have given you from their gardens.


I do recommend baking them on a wire baking rack if you have one. I think it makes them taste better.


Recipe for Zucchini Parmesan Crisps

Ingredients:

cooking spray
2 medium zucchini, about 1 pound total
2 tablespoons olive oil
1/4 cup freshly grated parmesan
1/4 cup bread crumbs, Panko or regular
1/2 teaspoon Johnny's seasoning salt, or regular seasoning salt
1/8 teaspoon black pepper

Directions:

Preheat oven to 400 degrees. Spray a baking sheet or wire rack with baking sheet underneath, with cooking spray.

Slice the zucchini into 1/4 inch thick rounds. In a medium bowl, toss the zucchini with the olive oil.
In a small bowl, combine the Parmesan, breadcrumbs, seasoning salt, and pepper.

Dip each round into the Parmesan mixture, coating evenly on both sides. Press mixture onto round if needed.
Place on prepared baking sheet/rack in a single layer. Bake zucchini rounds until browned and crisp, about 25 minutes.
 Remove with spatula, and serve immediately with your favorite dipping sauce.

Eat and enjoy!!


Monday, August 19, 2013

Celebrating A Birthday With A Homemade Coconut Birthday Cake


This weekend my family and I celebrated my daughter Samantha's birthday. It was a lovely day, with lunch at one of our favorite restaurants, and a delicious Italian dinner prepared for us by her husband.

I made her birthday cake, it was coconut, a kind I had never made before. It came out wonderful, and it's a perfect cake for any special occasion.
My grandsons picked out these fun candles, they thought their Mom would like them, and she did.


This recipe is from Ina Garten, otherwise known as the Barefoot Contessa. You can find it in the Barefoot Contessa At Home cookbook, and here is the recipe at the Food Network website.

This cake does take some time to make, and requires quite a lot of butter, but it is well worth the effort. I just love Ina Garten, and all of her recipes that I have tried always come out well. This is the first time I made this cake, and everyone loved it so much, I'll be making it again.


You don't even have to be a coconut lover to love the taste of this cake either. My six year old grandson was sure he wouldn't like the cake until he tasted it. He ate it all and told me he wanted this cake for his own birthday.


I think this cake makes a very pretty presentation, and whatever occasion you make for, you'll definitely enjoy it.

The recipe is quite long, so I have included it in the link above. I guarantee that if you make this cake, you'll love it!!

Thursday, August 15, 2013

Old Fashioned Pineapple Upside Down Cake


Pineapple upside down cake really is one of my favorite desserts. Not only is it delicious, but it holds a happy memory for me, because I remember coming home from school, and my Mom would give me a piece, with a cold glass of milk.

I actually only made this cake a couple of times for my own kids when they were young, but now that they are all grown up, I have more time to bake from scratch.
I know how tempting it is to use a box of cake mix instead of baking from scratch, but it really isn't that much harder, and it makes all the difference in the world.

Anyway, this is a recipe from Martha Stewart, and it's actually quite easy. I've made it a few times and it has always come out moist and delicious.


I don't usually change or tweak a Martha recipe, but I did with this cake. It called for the rind and juice from a lime, but I didn't care for the taste the first time I made it. I used a lemon instead, and that tasted much better to me. The recipe also called for pecans, which I'm sure would be good, but I used the cherries instead, just like my mother did, so many years ago.

Food has the power to stir up memories, both good and bad, from the past. I love this cake because it does remind me of my Mom, whom I lost when I was only thirty, and I still miss her everyday.


Recipe for Old Fashioned Pineapple Upside Down Cake

Ingredients:

1 1/3 cups all-purpose flour
3/4 cup sugar
2 teaspoons baking powder
1/2 teaspoon salt
1/4 cup vegetable oil
3/4 cup milk
1 teaspoon vanilla
1 egg
grated rind from 1 lemon
1 tablespoon fresh lemon juice
1/4 cup butter (1/2 stick)
1/2 cup dark or light brown sugar
1 20-ounce can pineapple slices
1 small jar Maraschino cherries

Directions:

Preheat oven to 350 degrees.
In a mixing bowl, sift together the flour, sugar, baking powder, and salt. Add the oil and milk to the bowl and beat with an electric mixer for 1 minute. Add the vanilla, egg, lemon rind, and lemon juice, mixing just until well combined.

In a 9-10 inch round cake pan, on the stove, melt the butter over low heat. Remove from the heat and sprinkle the brown sugar around the pan. Arrange the pineapple slices and cherries on top.
Pour the batter evenly over the top, and bake for 30 minutes.

Remove cake from the oven and cool in the pan for 5 minutes. Turn cake out onto a circular platter.

Eat, and enjoy!


Thursday, August 8, 2013

Simple Suppers - Stuffed Bell Peppers With Bleu Cheese Crumbles


One of the things I have tried to be more conscious of in my cooking is trying to cook with the seasons. You know, eating what's plentiful, and in season  at the grocery store or farmer's market, and incorporating that into your meal plans.

Lately, the bell peppers have been so gorgeous that they inspired me to make one of my favorite meals, stuffed peppers.
I like the flexibility of ingredients for stuffed peppers, and you can use turkey, or beef, or make them without meat if you like, too. And you can put veggies in them, from zucchini to tomatoes, to carrots.


For this version of stuffed peppers, I made them with healthy and yummy ground turkey. I put in lots of onions and chopped some mushroom to add to the meat mixture.
This really is an easy meal, and I like knowing that the red peppers are so healthy for you.


The tomato sauce on top of the peppers adds to their great taste, and makes them look good.


I have been a little obsessed with these bleu cheese crumbles lately from Trader Joe's, and have been finding all kinds of ways to use them.
Ground turkey can be a little bland for me sometimes, and so I added the crumbles to top the peppers, and I was pretty much in heaven. They added a delicious kick to the peppers, and I'll make this recipe again, using the bleu cheese crumbles.

Just add some delicious garlic bread and your favorite glass of wine, and you have an easy and delicious summer dinner to enjoy!


Recipe for Stuffed Bell Peppers with Bleu Cheese Crumbles

Ingredients:

3 large red bell peppers
1 pound of lean ground turkey
3/4 cup Panko bread crumbs
1 large egg
1/2 cup chopped onion
1/2 cup chopped button mushrooms
1 teaspoon salt
1 teaspoon pepper
2 tablespoons Italian seasoning
1 small can tomato sauce
3/4 cup bleu cheese crumbles, or top with the amount of your choice

Directions:

Preheat oven to 400 degrees. Grease a large baking dish with vegetable oil.

Wash and cut peppers in half. Cut off stems and remove seeds.

In a large bowl, combine turkey, bread crumbs, egg, onion, mushrooms, salt, and pepper. Pat meat mixture into each half of pepper. Put peppers into greased baking dish.

Spread each pepper with tomato sauce. Generously sprinkle Italian seasoning over peppers.

Bake in the oven for 45-50 minutes. Top with bleu cheese crumbles.


Tuesday, August 6, 2013

#ad Help Donate Money To Your School With The Tyson Back To School Project A+ Program #cbias


I love cooking for my family, and recently I made a quick dinner of easy chicken tostadas. I have been using Tyson Chicken products for years, and with so many different varieties of chicken to choose from, there's always one that will fit right into my dinner or lunch recipes.

Did you know that when you buy Tyson products, not only are you buying delicious chicken, but you have the opportunity to help the school of your choice to receive money?

Tyson has a program called Tyson Back to School Project A+ that is so easy to join and participate in.
When my children were going to school, it was always very important to me that they had the best learning experience possible. That takes time, caring, volunteering, and money. But not all schools are well funded, and that cuts into the quality of children's educations.

As a grandmother, I care very much about the school my grandson will be starting first grade at, and where his brother and sister will also be attending in a few years.

Signing up for the Tyson Project A+ program lets me and my family help out, and that money can go towards making sure all students have the materials they need for a positive and happy learning experience.


When you buy Tyson chicken with the Project A+ emblem, you can start  helping your own school to receive money from Tyson. Simply look on the back of the package for the label that says, 'Support Your School', cut it out, and give it to your school.

Tyson will give 24 cents for each label they receive, an amount that is higher than most other programs. The money can be used for any need or project that the school decides upon.


Signing up your school to participate in the Tyson Project A+ program is easy. All you need is your school's address and phone number, information that is available on the school's website.

The Tyson Project A+  website is the place to go to get started so that your school can be included in this great program. The site is filled with information and inspiration to motivate yourself, your community, your school and friends to get involved.


If you are like me, you already buy Tyson chicken products to make delicious meals for your family, and this is such an easy way to help out your own school. Can you imagine how much money could be raised if we all participated in the Tyson Project A+ program?

It's exciting to think about, and bringing awareness to this program and spreading the word to others about how they can participate should be our goal.

Tyson's donation of 24 cents per label could make a major impact on our schools if we all got involved. It's so easy to participate, and I encourage you to sign-up your school and start making a difference with the Tyson Project A+ in your child's school.


When I was shopping at Walmart, I saw many, many packages of Tyson Chicken with the Project A+ emblem on them. With so many varieties to choose from, it's easy to provide your family with delicious meals while helping out your school.


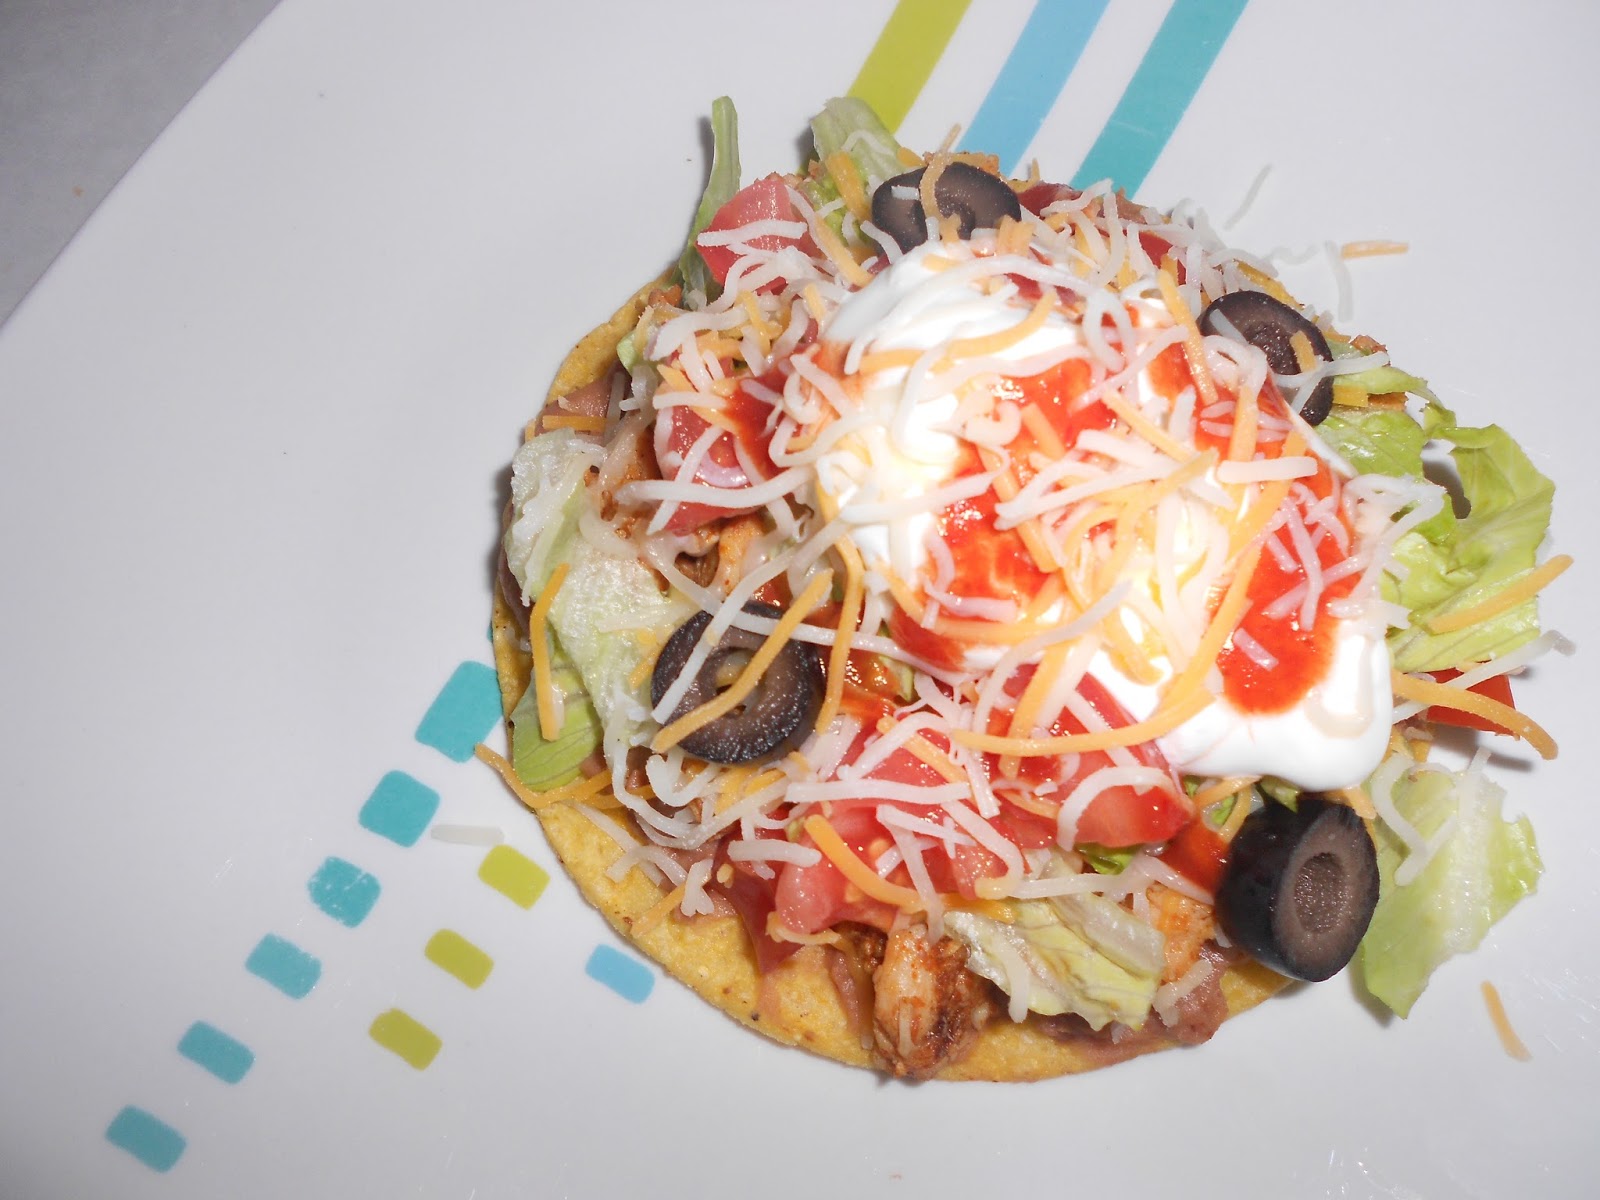
Making chicken tostadas with the already cooked Tyson chicken was a breeze. I just heated up the chicken, prepared the other ingredients, like tomatoes, lettuce, and olives, and dinner was ready.

Chicken Tostadas Recipe:

Ingredients:

1 bag of Tyson chicken, already grilled and diced
1 package taco seasoning
I large can of refried beans
2 cups shredded Mexican cheese
2 large tomatoes, diced
sliced lettuce
can of black olives
sour cream
bottle of hot sauce
package of 12 tostada shells

Directions:

Cook chicken in a frying pan, breaking it up, and then add taco seasoning and cook according to package directions.

Heat up refried beans in a pan. Cut up tomatoes, olives, and lettuce. Heat tostada shells in the oven until warmed.

Spread a layer of beans, and then chicken on a tostada shell. Top with lettuce, tomatoes, olives, cheese, sour cream and hot sauce.


With back to school just around the corner for us, we'll be using Tyson chicken products to make lots of easy and delicious dinners.

I love that using the foods we already buy and enjoy can help make a difference to my grandson's school.
I am happy to be participating in the Tyson Back to School Project A+ program, and I hope you'll join too, and start helping to make a difference in the school of your choice.


You can see my shopping trip at Walmart for Tyson products in my Google+ Album and how you can start helping when you #Clip4School with Tyson labels.

You can also connect with Tyson on Facebook and Twitter.

Friday, August 2, 2013

Quick Strawberry Cinnamon Bread


Strawberries are still plentiful at the farmer's markets and grocery stores, so I am trying to take advantage of that before fall arrives.
 I think it is so crazy how summer is just flying by, and before we know it, the season will be over.

So meanwhile, I have made this quick and easy fruit bread. It's cheating a little bit because this recipe calls for a can of refrigerated cinnamon rolls as its base, but that is what makes it so easy to make.


The great thing about this strawberry cinnamon bread is that it's delicious for breakfast, brunch, or dessert, along with a scoop of vanilla ice cream on top.


I'm really finding that using coffee creamer to cook with is versatile and economical. I used my favorite flavor in this recipe, Sweet Italian Cream.


This recipe really only takes a few minutes to put together. You can also easily double it if you are serving it when you are entertaining.


Make sure the cinnamon rolls are completely covered by the egg and strawberry mixture. You can also make this with peaches or other kinds of berries.


Recipe for Quick Strawberry Cinnamon Bread

Ingredients:

1 can good quality refrigerated cinnamon rolls, with frosting
1 cup strawberries, cut in half and slightly smashed with a fork
3 eggs
1/4 cup coffee creamer, Sweet Italian Cream, or Vanilla flavor
1 teaspoon cinnamon
1 teaspoon vanilla

Directions:

Preheat oven to 350 degrees.
Open cinnamon rolls and place evenly into a greased 9x9 baking dish.
In a medium bowl, whisk together eggs, coffee creamer, cinnamon and vanilla. Stir in strawberries.
Pour egg mixture over cinnamon rolls in baking dish.
Bake in oven for 25-30 minutes, or until eggs are set, and rolls are golden.
Let rolls sit 5 minutes after coming out of oven.
Microwave frosting about 10 seconds, and then pour over bread.
Serve or at room temperature,

Serves 4-6